Entity type created successfully – Vertex AI Feature Store
Step 6: Entity type created successfully
The entity type is created successfully as shown in Figure 9.8 under the selected feature store:

Figure 9.8: Entity type created and listed on the landing page
- Click the newly created Entity type.
Step 7: Creation of features
Once the entity type is created, features need to be created before ingesting the values. Follow the steps mentioned in Figure 9.9 to create features:

Figure 9.9: Creation of features
- Click ADD FEATURES.
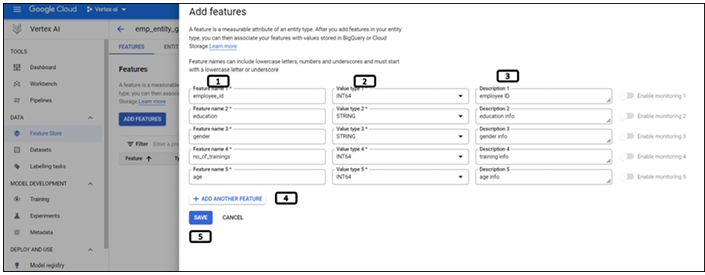
A new side tab will pop out to enter the features as shown in Figure 9.10, follow the below steps to create the features:

Figure 9.10: Adding user input for feature creation
- Enter the Feature name.
- Enter the Value type stored in that feature.
- Enter the Description for the feature.
- Click Add Another Feature to add new features.
- Click SAVE, once all the features are added.
Step 8: Features created successfully
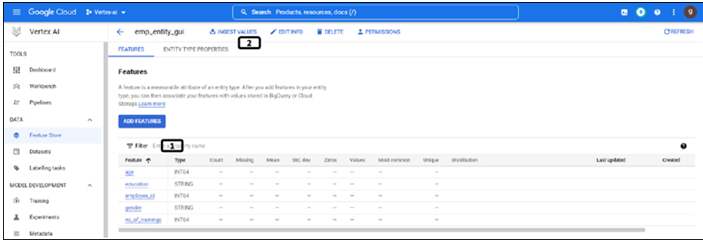
Once the features are created successfully, they are displayed on the entity type page as shown in Figure 9.11:

Figure 9.11: Features listed under the entity type
- Newly created features are displayed in tabular format.
- Click on Ingest Values to add the feature values.
Step 9: Ingesting feature values
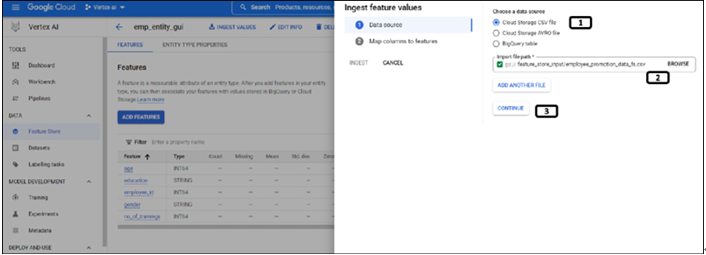
Follow the steps mentioned in Figure 9.12 to initiate the ingestion of feature values:

Figure 9.12: Importing data to features
- Data can be ingested from cloud storage or BigQuery. Select Cloud Storage CSV file.
- Select the CSV file from the cloud storage by clicking BROWSE.
- Click CONTINUE and follow the steps mentioned in Figure 9.13:
After selecting the data source, we need to map the columns of the data source to the features. Follow the steps mentioned in the Figure 9.13 to map the features:

Figure 9.13: Mapping of columns to features
- Add employee ID, since that is the column which is containing unique values.
- Select to enter the Timestamp manually. If data contains the timestamp values, the same column can be used here.
- Select the date and time.
- Map the column names in the CSV file to the features.
- Click INGEST to initiate the ingestion job.
Step 10: Ingestion job successful
Once the feature values are ingested successfully, the ingestion job status will be updated as shown in Figure 9.14:

Figure 9.14: Ingestion jobs of feature store
- The ingestion job is completed successfully.
Step 11: Landing page of feature store after the creation of feature store, entity type, and features
The landing page of the feature store is shown in Figure 9.15, all the features under entity type and feature store are listed and displayed in the tabular format:

Figure 9.15: Landing page of feature store after the creation of features
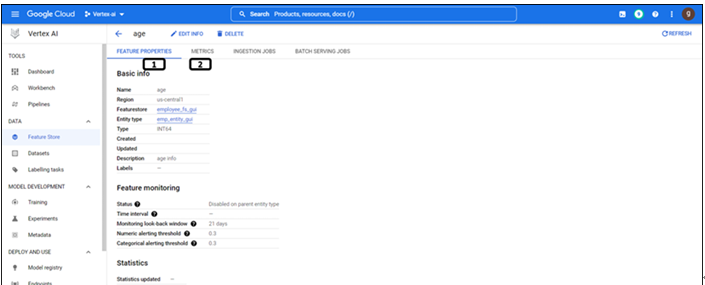
- Click the age feature. The window will navigate to the properties of the feature as shown in Figure 9.16:

Figure 9.16: Properties of feature
- For all the features, Feature Properties consisting of basic information and statistics are displayed.
- Metrics are populated if the monitoring feature is enabled for the feature store and for that particular feature.