Explanations for image classification – Explainable AI
Once the model is deployed successfully, open the Jupyter lab from the workbench created and enter the Python code given in the following steps:
Step 1: Install the required packages
Type the following Python code to install the required packages:
!pip install tensorflow
!pip install pip install google-cloud-aiplatform==1.12.1
Step 2: Kernel restart
Type following commands in the next cell, to restart the kernel: (Users can restart kernel from the GUI as well):
import os
import IPython
if not os.getenv(“”):
Ipython.Application.instance().kernel.do_shutdown(True)
Step 3: Importing required packages
Once the kernel is restarted, run the following lines of codes to import the packages:
import base64
import tensorflow as tf
import google.cloud.aiplatform as gcai
import explainable_ai_sdk
import io
import matplotlib.image as mpimg
import matplotlib.pyplot as plt
Step 4: Input for prediction and explanation
Choose any image from the training set (stored in the cloud storage for the prediction) and provide the full path of the image chosen in the following code. Run the cell to read the image and covert the image to the required format:
img_input = tf.io.read_file(“gs://AutoML_image_data_exai/Kayak/adventure-clear-water-exercise-1836601.jpg”)
b64str = base64.b64encode(img_input.numpy()).decode(“utf-8”)
instances_image = [{“content”: b64str}]
Step 5: Selection of the endpoint select
Run the following lines of code to select the endpoint where the model is deployed. In this method, we are using the display name of the endpoint (instead of the endpoint ID). Image_ex is the endpoint name where the model is deployed. Full path of the endpoint (along with the endpoint ID) will be displayed in the output:
endpoint = gcai.Endpoint(gcai.Endpoint.list(
filter=f’display_name={“image_ex”}’,
order_by=’update_time’)[-1].gca_resource.name)
print(endpoint)
Step 6: Image prediction
Run the following lines of code to get the prediction from the deployed model:
prediction = endpoint.predict(instances=instances_image)
print(prediction)
Prediction results will be displayed as shown in the following figure which contains display names and the probability of the classes:

Figure 10.15: Image classification prediction result
Note: Since we are running this code using the Vertex AI workbench, we are not using service account for authentication.
Step 7: Explanations
Run the following lines of codes to get the explanations for the input image:
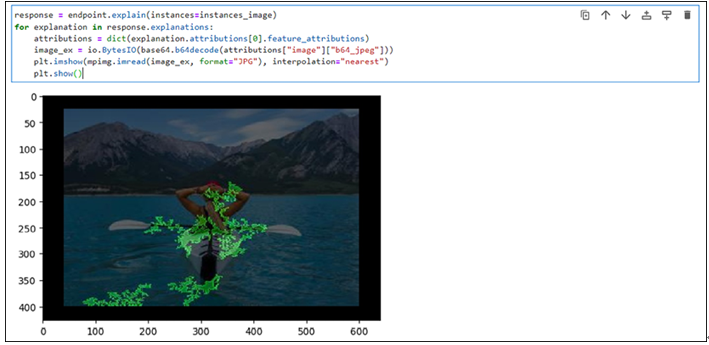
response = endpoint.explain(instances=instances_image)
for explanation in response.explanations:
attributions = dict(explanation.attributions[0].feature_attributions)
image_ex = io.BytesIO(base64.b64decode(attributions[“image”][“b64_jpeg”]))
plt.imshow(mpimg.imread(image_ex, format=”JPG”), interpolation=”nearest”)
plt.show()
The output of the explanations is shown in the figure. Highlighted areas in green indicates areas/pixels which played important role for the prediction of the image:

Figure 10.16: Image classification model explanation
Leave a Reply