Category Feature attribution methods

Understanding the web – request/response – Introduction

Before going any further, it is imperative to understand the basic concept of the web. The idea behind HTTP 1.X is that a client sends an HTTP request to a server, and then the server responds to that client. That can sound trivial if you have web development experience. However, it is one of the most important web programming concepts, irrespective of whether you are building web APIs, websites, or complex cloud applications.Let’s reduce an HTTP request lifetime to the following:

  1. The communication starts.
  2. The client sends a request to the server.
  3. The server receives the request.
  4. The server does something with the request, like executing code/logic.
  5. The server responds to the client.
  6. The communication ends.

After that cycle, the server is no longer aware of the client. Moreover, if the client sends another request, the server is unaware that it responded to a request earlier for that same client because HTTP is stateless.There are mechanisms for creating a sense of persistence between requests for the server to be “aware” of its clients. The most well-known of these is cookies.If we dig deeper, an HTTP request comprises a header and an optional body. Then, requests are sent using a specific method. The most common HTTP methods are GET and POST. On top of those, extensively used by web APIs, we can add PUT, DELETE, and PATCH to that list.Although not every HTTP method accepts a body, can respond with a body, or should be idempotent, here is a quick reference table:

MethodRequest has bodyResponse has bodyIdempotent
GETNo*YesYes
POSTYesYesNo
PUTYesNoYes
PATCHYesYesNo
DELETEMayMayYes

* Sending a body with a GET request is not forbidden by the HTTP specifications, but the semantics of such a request are not defined either. It is best to avoid sending GET requests with a body.

An idempotent request is a request that always yields the same result, whether it is sent once or multiple times. For example, sending the same POST request multiple times should create multiple similar entities, while sending the same DELETE request multiple times should delete a single entity. The status code of an idempotent request may vary, but the server state should remain the same. We explore those concepts in more depth in Chapter 4, Model-View-Controller.Here is an example of a GET request:

GET http: //www.forevolve.com/ HTTP/1.1
Host: www.forevolve.com
Connection: keep-alive
Upgrade-Insecure-Requests: 1
User-Agent: Mozilla/5.0 (Windows NT 10.0; Win64; x64)
AppleWebKit/537.36 (KHTML, like Gecko) Chrome/70.0.3538.110 Safari/537.36
Accept: text/html,application/xhtml+xml,application/xml;q=0.9,image/webp,image/apng,*/*;q=0.8
Accept-Encoding: gzip, deflate
Accept-Language: en-US,en;q=0.9,fr-CA;q=0.8,fr;q=0.7
Cookie: …

The HTTP header comprises a list of key/value pairs representing metadata that a client wants to send to the server. In this case, I queried my blog using the GET method and Google Chrome attached some additional information to the request. I replaced the Cookie header’s value with … because it can be pretty large and that information is irrelevant to this sample. Nonetheless, cookies are passed back and forth like any other HTTP header.
Code smell – Control Freak – Introduction

An excellent example of a code smell is using the new keyword. This indicates a hardcoded dependency where the creator controls the new object and its lifetime. This is also known as the Control Freak anti-pattern, but I prefer to box it as a code smell instead of an anti-pattern since the new keyword is not intrinsically wrong.At this point, you may be wondering how it is possible not to use the new keyword in object-oriented programming, but rest assured, we will cover that and expand on the control freak code smell in Chapter 7, Deep Dive into Dependency Injection.

Code smell – Long Methods

The long methods code smell is when a method extends to more than 10 to 15 lines of code. That is a good indicator that you should think about that method differently. Having comments that separate multiple code blocks is a good indicator of a method that may be too long.Here are a few examples of what the case might be:

  • The method contains complex logic intertwined in multiple conditional statements.
  • The method contains a big switch block.
  • The method does too many things.
  • The method contains duplications of code.

To fix this, you could do the following:

  • Extract one or more private methods.
  • Extract some code to new classes.
  • Reuse the code from external classes.
  • If you have a lot of conditional statements or a huge switch block, you could leverage a design pattern such as the Chain of Responsibility, or CQRS, which you will learn about in Chapter 10, Behavioral Patterns, and Chapter 14, Mediator and CQRS Design Patterns.

Usually, each problem has one or more solutions; you need to spot the problem and then find, choose, and implement one of the solutions. Let’s be clear: a method containing 16 lines does not necessarily need refactoring; it could be OK. Remember that a code smell indicates that there might be a problem, not that there necessarily is one—apply common sense.

Anti-patterns and code smells – Introduction

Anti-patterns and code smells are bad architectural practices or tips about possible bad design. Learning about best practices is as important as learning about bad ones, which is where we start. The book highlights multiple anti-patterns and code smells to help you get started. Next, we briefly explore the first few.

Anti-patterns

An anti-pattern is the opposite of a design pattern: it is a proven flawed technique that will most likely cause you trouble and cost you time and money (and probably give you headaches).An anti-pattern is a pattern that seems a good idea and seems to be the solution you were looking for, but it causes more harm than good. Some anti-patterns started as legitimate design patterns and were labelled anti-patterns later. Sometimes, it is a matter of opinion, and sometimes the classification can be influenced by the programming language or technologies.Let’s look at an example next. We will explore some other anti-patterns throughout the book.

Anti-pattern – God Class

A God class is a class that handles too many things. Typically, this class serves as a central entity which many other classes inherit or use within the application it is the class that knows and manages everything in the system; it is the class. On the other hand, it is also the class that nobody wants to update, which breaks the application every time somebody touches it: it is an evil class!The best way to fix this is to segregate responsibilities and allocate them to multiple classes rather than concentrating them in a single class. We look at how to split responsibilities throughout the book, which helps create more robust software.If you have a personal project with a God class at its core, start by reading the book and then try to apply the principles and patterns you learn to divide that class into multiple smaller classes that interact together. Try to organize those new classes into cohesive units, modules, or assemblies.To help fix God classes, we dive into architectural principles in Chapter 3, Architectural Principles, opening the way to concepts such as responsibility segregation.

Code smells

A code smell is an indicator of a possible problem. It points to areas of your design that could benefit from a redesign. By “code smell,” we mean “code that stinks” or “code that does not smell right.”It is important to note that a code smell only indicates the possibility of a problem; it does not mean a problem exists. Code smells are usually good indicators, so it is worth analyzing your software’s “smelly” parts.An excellent example is when a method requires many comments to explain its logic. That often means that the code could be split into smaller methods with proper names, leading to more readable code and allowing you to get rid of those pesky comments.Another note about comments is that they don’t evolve, so what often happens is that the code described by a comment changes, but the comment remains the same. That leaves a false or obsolete description of a block of code that can lead a developer astray.The same is also true with method names. Sometimes, the method’s name and body tell a different story, leading to the same issues. Nevertheless, this happens less often than orphan or obsolete comments since programmers tend to read and write code better than spoken language comments. Nonetheless, keep that in mind when reading, writing, or reviewing code.

What is a design pattern? – Introduction

Since you just purchased a book about design patterns, I guess you have some idea of what design patterns are, but let’s make sure that we are on the same page.Abstract definition: A design pattern is a proven technique that we can use to solve a specific problem.In this book, we apply different patterns to solve various problems and leverage some open-source tools to go further, faster! Abstract definitions make people sound smart, but understanding concepts requires more practice, and there is no better way to learn than by experimenting with something, and design patterns are no different.If that definition does not make sense to you yet, don’t worry. You should have enough information by the end of the book to correlate the multiple practical examples and explanations with that definition, making it crystal clear.I like to compare programming to playing with LEGO® because what you have to do is very similar: put small pieces together to create something bigger. Therefore, if you lack imagination or skills, possibly because you are too young, your castle might not look as good as someone with more experience. With that analogy in mind, a design pattern is a plan to assemble a solution that fits one or more scenarios, like the tower of a castle. Once you designed a single tower, you can build multiple by following the same steps. Design patterns act as that tower plan and give you the tools to assemble reliable pieces to improve your masterpiece (program).However, instead of snapping LEGO® blocks together, you nest code blocks and interweave objects in a virtual environment!Before going into more detail, well-thought-out applications of design patterns should improve your application designs. That is true whether designing a small component or a whole system. However, be careful: throwing patterns into the mix just to use them can lead to the opposite result: over-engineering. Instead, aim to write the least amount of readable code that solves your issue or automates your process.As we have briefly mentioned, design patterns apply to different software engineering levels, and in this book, we start small and grow to a cloud-scale! We follow a smooth learning curve, starting with simpler patterns and code samples that bend good practices to focus on the patterns—finally ending with more advanced topics and good practices.Of course, some subjects are overviews more than deep dives, like automated testing, because no one can fit it all in a single book. Nonetheless, I’ve done my best to give you as much information about architecture-related subjects as possible to ensure the proper foundations are in place for you to get as much as possible out of the more advanced topics, and I sincerely hope you’ll find this book a helpful and enjoyable read.Let’s start with the opposite of design patterns because it is essential to identify wrong ways of doing things to avoid making those mistakes or to correct them when you see them. Of course, knowing the right way to overcome specific problems using design patterns is also crucial.

Before you begin: Join our book community on Discord – Introduction

Give your feedback straight to the author himself and chat to other early readers on our Discord server (find the “architecting-aspnet-core-apps-3e” channel under EARLY ACCESS SUBSCRIPTION).

https://packt.link/EarlyAccess

The goal of this book is not to create yet another design pattern book; instead, the chapters are organized according to scale and topic, allowing you to start small with a solid foundation and build slowly upon it, just like you would build a program.Instead of a guide covering a few ways of applying a design pattern, we will explore the thought processes behind the systems we are designing from a software engineer’s point of view.This is not a magic recipe book; from experience, there is no magical recipe when designing software; there are only your logic, knowledge, experience, and analytical skills. Let’s define “experience” as your past successes and failures. And don’t worry, you will fail during your career, but don’t get discouraged by it. The faster you fail, the faster you can recover and learn, leading to successful products. Many techniques covered in this book should help you achieve success. Everyone has failed and made mistakes; you aren’t the first and certainly won’t be the last. To paraphrase a well-known saying by Roosevelt: the people that never fail are the ones who never do anything.At a high level:

  • This book explores basic patterns, unit testing, architectural principles, and some ASP.NET Core mechanisms.
  • Then, we move up to the component scale, exploring patterns oriented toward small chunks of software and individual units.
  • After that, we move to application-scale patterns and techniques, exploring ways to structure an application.
  • Some subjects covered throughout the book could have a book of their own, so after this book, you should have plenty of ideas about where to continue your journey into software architecture.

Here are a few pointers about this book that are worth mentioning:

  • The chapters are organized to start with small-scale patterns and then progress to higher-level ones, making the learning curve easier.
  • Instead of giving you a recipe, the book focuses on the thinking behind things and shows the evolution of some techniques to help you understand why the shift happened.
  • Many use cases combine more than one design pattern to illustrate alternate usage so you can understand and use the patterns efficiently. This also shows that design patterns are not beasts to tame but tools to use, manipulate, and bend to your will.
  • As in real life, no textbook solution can solve all our problems; real problems are always more complicated than what’s explained in textbooks. In this book, I aim to show you how to mix and match patterns to think “architecture” instead of giving you step-by-step instructions to reproduce.

The rest of the introduction chapter introduces the concepts we explore throughout the book, including refreshers on a few notions. We also touch on .NET, its tooling, and some technical requirements.In this chapter, we cover the following topics:

  • What is a design pattern?
  • Anti-patterns and code smell.
  • Understanding the web – request/response.
  • Getting started with .NET.

Explanations for tabular data (classification) – Explainable AI

Once the model is deployed successfully, open the Jupyter lab from the workbench created and enter the Python code given in the below steps.
Step 1: Input for prediction and explanation
Select any record from the data. Modify it in the below mentioned format and run the cell:
instances_tabular=[{“BMI”:”16.6”,”Smoking”:”Yes”,”AlcoholDrinking”:”No”,”Stroke”:”No”,”PhysicalHealth”:”3”,”MentalHealth”:”30”,”DiffWalking”:”No”,”Sex”:”Female”,”AgeCategory”:”55-59”,”Race”:”White”,”Diabetic”:”Yes”,”PhysicalActivity”:”Yes”,”GenHealth”:”Very good”,”SleepTime”:”5”,”Asthma”:”Yes”,”KidneyDisease”:”No”,”SkinCancer”:”Yes”}]

Step 2: Selection of the endpoint select
Run the below lines of code to select the endpoint where the model is deployed. In this method, we are using the display name of the endpoint (instead of the endpoint ID). “tabu” is the endpoint name where the model is deployed. Full path of the endpoint (along with the endpoint ID) will be displayed in the output:
endpoint_tabular = gcai.Endpoint(gcai.Endpoint.list(
filter=f’display_name={“tabu”}’,
order_by=’update_time’)[-1].gca_resource.name)
print(endpoint_tabular)

Step 3: Prediction
Run the following lines of code to get the prediction from the deployed model:
tab_endpoint = gcai.Endpoint(endpoint_name)
tab_explain_response = tab_endpoint.explain(instances=instances_tabular)
print(tab_explain_response)
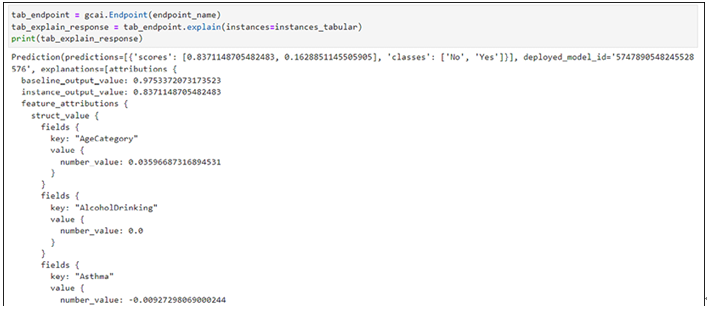
Prediction results will be displayed as shown in the following figure which contains classes and the probability of the classes:

Figure 10.23: Predictions from deployed tabular classification model
Step 4: Explanations
Run the following lines of codes to get the explanations for the input record:
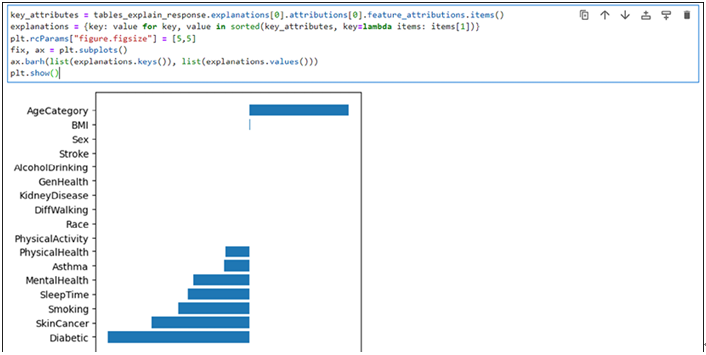
key_attributes = tables_explain_response.explanations[0].attributions[0].feature_attributions.items()
explanations = {key: value for key, value in sorted(key_attributes, key=lambda items: items[1])}
plt.rcParams[“figure.figsize”] = [5,5]
fix, ax = plt.subplots()
ax.barh(list(explanations.keys()), list(explanations.values()))
plt.show()

Shapley value is provided in the explanations for each of the features and it is visualized as shown in the following figure:

Figure 10.24: Explanations from deployed tabular classification model
Deletion of resources
We have utilized cloud storage to store the data, delete the files from the cloud storage manually. Dataset is created for image data and tabular data to delete them manually. Classification models for image and tabular are deployed to get the predictions and explanations, ensure to un-deploy the model from the endpoints and delete the endpoints (Refer Chapter 2, Introduction to Vertex AI & AutoML Tabular and Chapter 3, AutoML Image, text and pre-built models). Predictions are obtained using workbench, ensure to delete the workbench instance.

Tabular classification model deployment – Explainable AI

In case of the image data, users had to configure explainable AI during the training and deployment phase, whereas, in case of tabular data, explainable AI needs to be configured only during the deployment phase (AutoML will enable the explainable AI by default during the training phase for the tabular data). Follow the steps mentioned in Chapter 2, Introduction to Vertex AI & AutoML Tabular for the tabular dataset creation and tabular AutoML model training. Follow the below mentioned steps for the model deployment of the trained model.

Step 1: Trained model in the model registry

Trained model will be listed in the model registry as shown in the following figure:

Figure 10.17: Model registry (tabular classification model)

  1. tabular_classification trained using AutoML. Click on the model and the version of the same.

Step 2: Deploy to end point

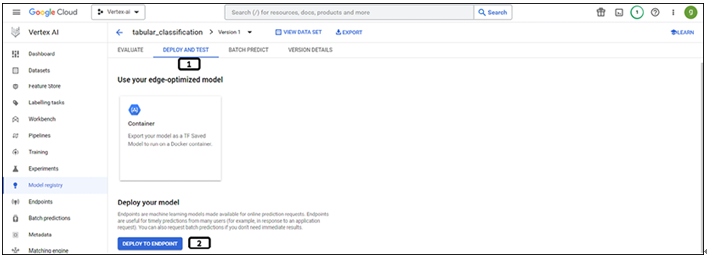
Once the model is selected (along with the version) users will get option to evaluate the model, deploy and test the model, and so on. Follow the steps mentioned below to deploy the model:

Figure 10.18: Trained tabular classification model

  1. Select DEPLOY AND TEST tab.
  2. Click DEPLOY TO ENDPOINT.

Step 3: Endpoint definition

Follow the steps mentioned below to define the endpoint:

Figure 10.19: Endpoint definition tabular classification model

  1. Provide Endpoint name.
  2. Click CONTINUE.

Step 4: Model settings

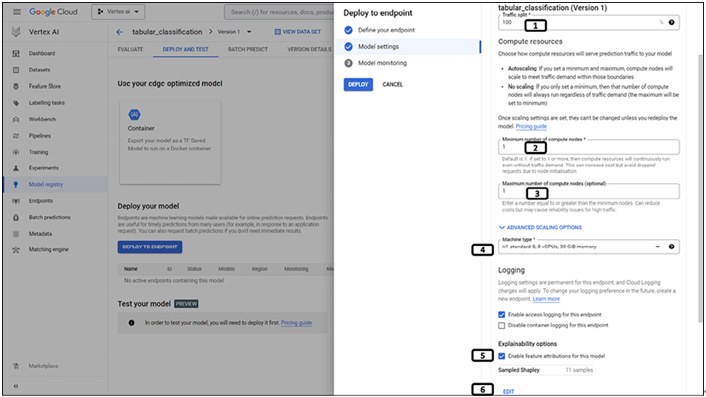
Follow the steps mentioned below to configure the model settings and to enable the explain ability options:

Figure 10.20: Model settings (enabling explain ability)

  1. Set the Traffic split to 100.
  2. Set the Minimum number of compute nodes to 1.
  3. Set the Maximum number of compute nodes to 1.
  4. Select n1-standard-8 in Machine type.
  5. Enable the Explainability options.
  6. Click EDIT.

Step 5: Set the Explainability options

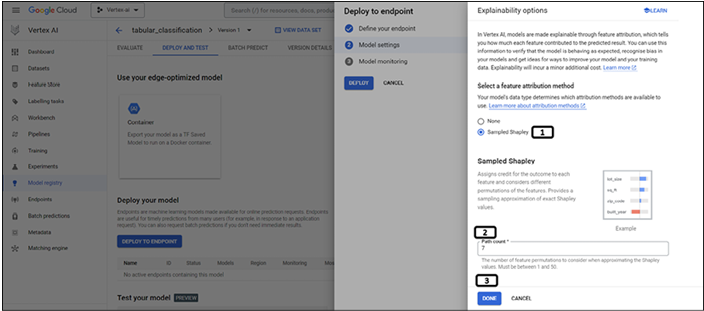
You can set the Explainability options by following the steps shown in the following figure:

Figure 10.21: Sampled Shapley path count

  1. Select Sampled Shapley method.
  2. Set the Path count to 7 (randomly chosen).
  3. Click DONE.

Step 6: Model monitoring

Follow the below mentioned steps to disable the model monitoring (since it is not needed for the explanations):

Figure 10.22: Model monitoring

  1. Disable Model monitoring options.
  2. Click DEPLOY.

Explain ability – Explainable AI

Step 5: Explain ability

Explain ability needs to be set in two places while working on AutoML images. The first one is during the training phase of the model and while deploying the model. Follow the below mentioned steps to configure explain ability of the model during training phase.

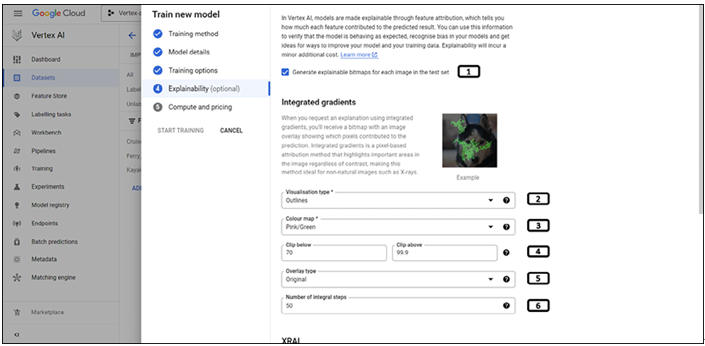
The steps shown below is for Integrated gradients method of Explainability as shown in the following screenshot:

Figure 10.7: Explain ability of image classification model

  1. Enable to Generate explainable bitmaps.
  2. Visualization type set to Outlines (pixels is another option to understand which pixels are playing important role for the prediction)..
  3.  Color map select Pink/Green (Pink/Green color are used to highlight the areas on the image).
  4.  Clip below and Clip above parameters are used to reduce the noise. Enter 70 and 99.9 for click below and above respectively.
  5. Select Original under Overlay type (pixels will be highlighted on top of the original image).
  6. Enter 50 for the Number of integral steps (increasing this parameter will reduce the approximation error).

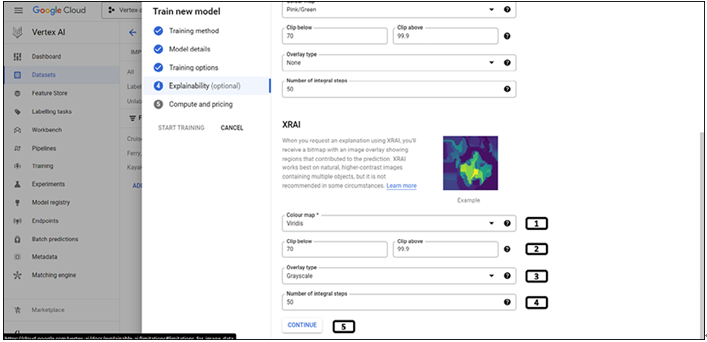
Scroll down and follow the steps mentioned in the following step to set the parameters for XRAI method:

Figure 10.8: Explain ability of image classification model (XRAI)

  1. Choose the Color map.
  2. Clip below and Clip above parameters are used to reduce the noise. Enter 70 and 99.9 for click below and above respectively.
  3. Select Original under Overlay type (pixels will be highlighted on top of the original image).
  4. Enter 50 for the Number of Integral steps (increasing this parameter will reduce the approximation error).
  5. Click CONTINUE.

Step 6: Compute and pricing

Follow the below mentioned steps to configure the budget for the model training:

Figure 10.9: Compute and training for image classification model

  1. Set the minimum node hours for 8 (it is the minimum value for image data).
  2. Click START TRAINING.

It will take a few hours to train the image classification model. Prediction and the explanation for the prediction can be obtained.

Data for Explainable AI exercise – Explainable AI

In this exercise, we will try to understand how explainable AI can be used to understand model prediction using image data and the tabular data with the help of AutoML of Vertex AI. The data used for AutoML tables and images will be used for this exercise as well. (Refer chapters Introduction to Vertex AI and AutoML Tabular and AutoML Image, text and pre-built models).

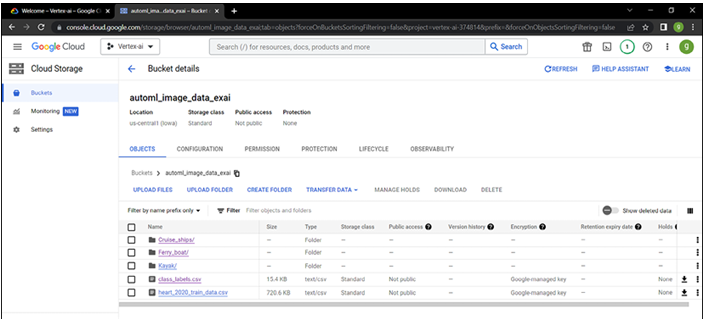
AutoML_image_data_exai bucket is created under us-centra1 (single region).

Three folders containing image data (Cise_ships, Ferry_boat and Kayak) is uploaded and CSV file (class_labels.csv) is created as shown in Chapter 3, AutoML Image, text and pre-built models (refer Figure 3.1 and 3.2 for csv creation). heart_2020_train_data.csv is uploaded to the same folder which will be used for AutoML tables. Figure 10.2 shows the data uploaded to the cloud storage:

Figure 10.2: Data uploaded to the cloud storage

Model training for image data

The initial steps for dataset creation for the image data will have no changes. Refer Image dataset creation of Chapter 3, AutoML Image, text and pre-built models and follow the below mentioned steps for AutoML model training.

Step 1: Train new model

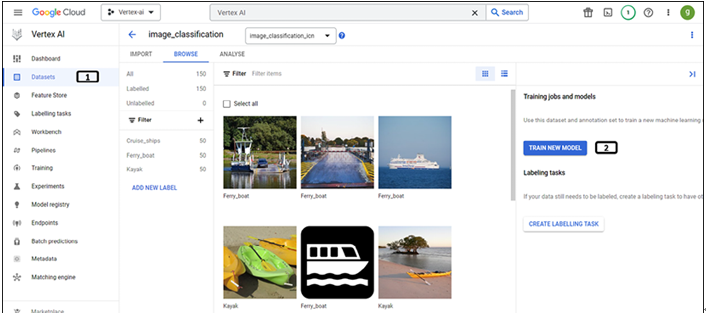
Newly created dataset will be listed under the dataset of the Vertex AI. Follow the below steps to initiate the model training as shown in the following screenshot:

Figure 10.3: Image dataset created on Vertex AI

  1. Click on Datasets section of Vertex AI (open the newly created image dataset).
  2. Click TRAIN NEW MODEL.

Step 2: Training method selection

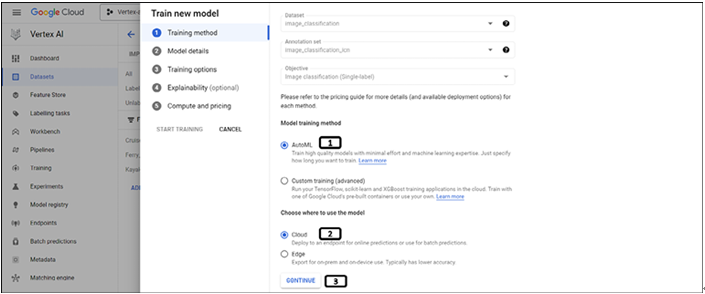
Training method step does not have difference as mentioned in Chapter 3, AutoML Image, text and pre-built models. Follow these steps to set the training method:

Figure 10.4: Training method selection

  1. Select AutoML.
  2. Select Cloud (we will deploy the model to get predictions and explanations).
  3. Click on CONTINUE.

Step 3: Model details

Follow the steps mentioned below to set the model details:

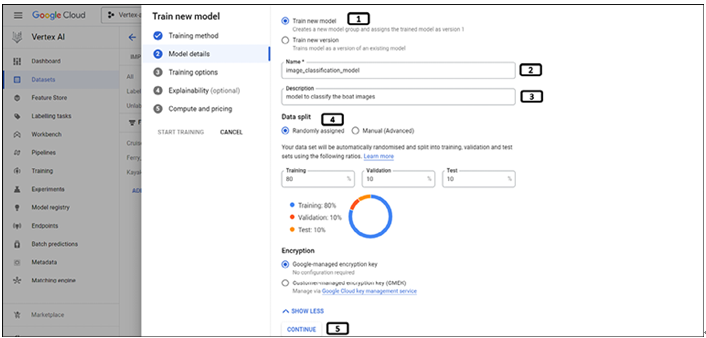
Figure 10.5: Image classification model details

  1. Select Train new model.
  2. Provide a Name for the model.
  3. Provide Description for the model.
  4. Under Data split select Randomly assigned.
  5. Click CONTINUE.

Step 4: Training options

Follow the below mentioned steps for training options:

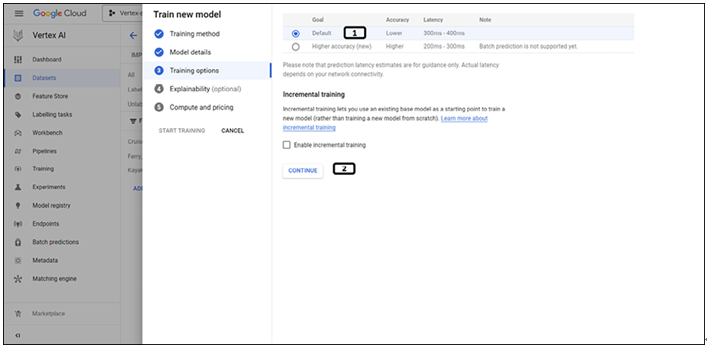
Figure 10.6: Image classification training options

  1. Select Default training method.
  2. Click CONTINUE (we do not have to enable incremental training for the explainable AI).

Need of Explainable AI – Explainable AI

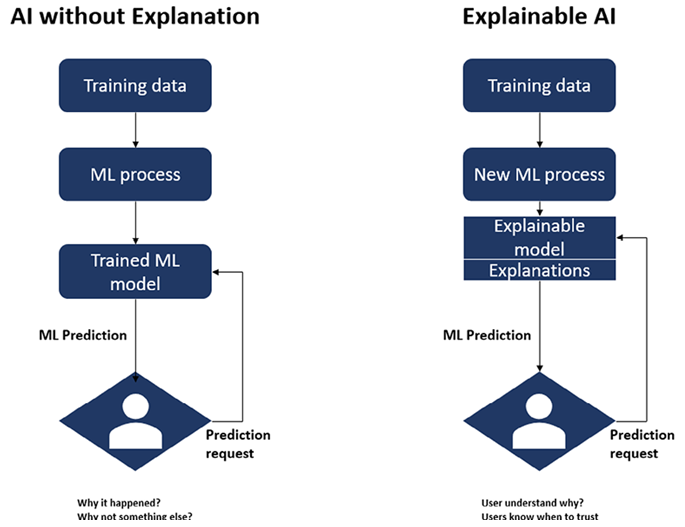
Artificial intelligence has the ability to automate judgments, and the outcomes of such decisions may have both beneficial and bad effects on businesses. It is essential to have an understanding of how AI comes to its conclusions, just as it is essential to have this understanding when recruiting decision is made for the business. A great number of companies are interested in using AI, but are hesitant to hand over decision-making authority to the model or AI simply because they do not yet trust the model. Explainability is beneficial in this regard since it offers insights into the decision-making process that models use. Explainable AI is a crucial component in the process of applying ethics to the usage of AI in business. Explainable AI is predicated on the notion that AI-based applications and technology should not be opaque “black box” models that are incomprehensible to regular people. Figure 10.1 shows the difference between AI and Explainable AI:

Figure 10.1: Explainable AI

In the majority of the scenarios developing complex models is far easier than convincing stakeholders that the model is capable of producing decisions that are superior to those produced by humans. It is not the same thing as having greater accuracy scores or a lower RMSE to make a better judgment. A correct conclusion may be reached by providing accurate data as input. In many cases, the person making the choice is the one who needs to comprehend it. For them to feel at ease handing over the decision-making to the model, they need to understand how the model came to its conclusions.

Explainable AI is essential to the development of responsible AI because it offers an adequate amount of transparency and responsibility for the choices made by complicated AI systems. This is of utmost importance when it comes to artificial intelligence systems that have a substantial influence on the lives of people.

XAI on Vertex AI

Explainable AI of Vertex AI provides explanations that are either feature-based or example-based in order to give a better understanding of how models make decisions. Anyone who builds or uses machine learning will gain new abilities if they learn how a model behaves and how it is influenced by its training dataset. These new abilities will allow users to improve their models, increase their confidence in their predictions, and understand when and why things work.