Tabular classification model deployment – Explainable AI
In case of the image data, users had to configure explainable AI during the training and deployment phase, whereas, in case of tabular data, explainable AI needs to be configured only during the deployment phase (AutoML will enable the explainable AI by default during the training phase for the tabular data). Follow the steps mentioned in Chapter 2, Introduction to Vertex AI & AutoML Tabular for the tabular dataset creation and tabular AutoML model training. Follow the below mentioned steps for the model deployment of the trained model.
Step 1: Trained model in the model registry
Trained model will be listed in the model registry as shown in the following figure:

Figure 10.17: Model registry (tabular classification model)
- tabular_classification trained using AutoML. Click on the model and the version of the same.
Step 2: Deploy to end point
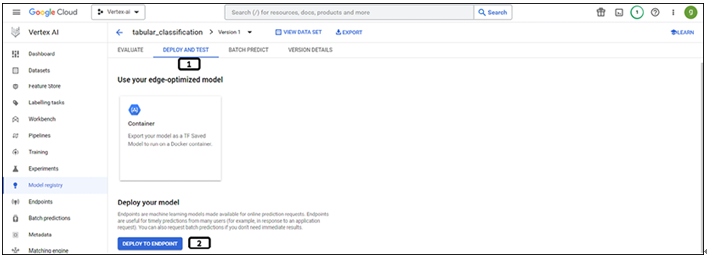
Once the model is selected (along with the version) users will get option to evaluate the model, deploy and test the model, and so on. Follow the steps mentioned below to deploy the model:

Figure 10.18: Trained tabular classification model
- Select DEPLOY AND TEST tab.
- Click DEPLOY TO ENDPOINT.
Step 3: Endpoint definition
Follow the steps mentioned below to define the endpoint:

Figure 10.19: Endpoint definition tabular classification model
- Provide Endpoint name.
- Click CONTINUE.
Step 4: Model settings
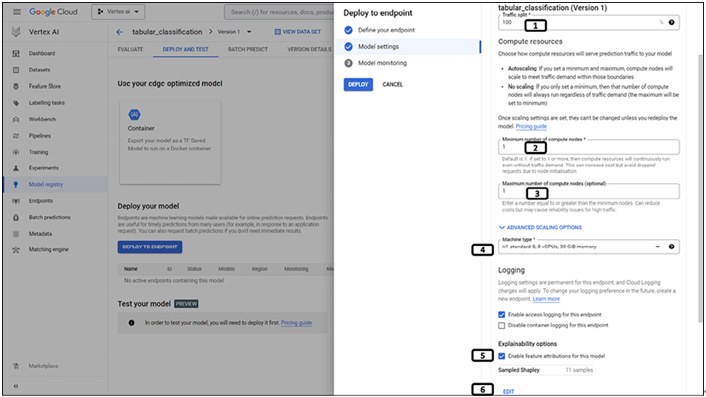
Follow the steps mentioned below to configure the model settings and to enable the explain ability options:

Figure 10.20: Model settings (enabling explain ability)
- Set the Traffic split to 100.
- Set the Minimum number of compute nodes to 1.
- Set the Maximum number of compute nodes to 1.
- Select n1-standard-8 in Machine type.
- Enable the Explainability options.
- Click EDIT.
Step 5: Set the Explainability options
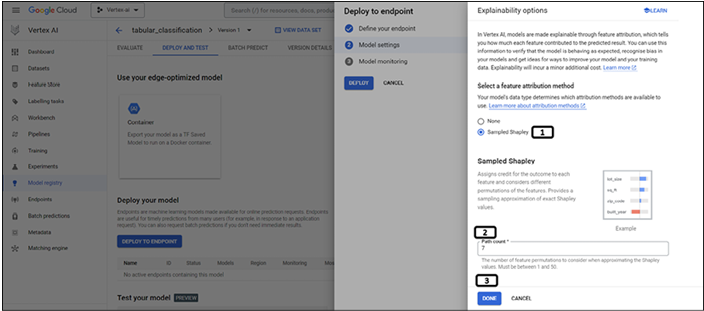
You can set the Explainability options by following the steps shown in the following figure:

Figure 10.21: Sampled Shapley path count
- Select Sampled Shapley method.
- Set the Path count to 7 (randomly chosen).
- Click DONE.
Step 6: Model monitoring
Follow the below mentioned steps to disable the model monitoring (since it is not needed for the explanations):

Figure 10.22: Model monitoring
- Disable Model monitoring options.
- Click DEPLOY.
Leave a Reply